Add a new user step-by-step
Managing Users needs to be done by the Web Manager or other Users with role Administrator.
Unlike a site visitor a WordPress User creates and manages the content and they need to login (authenticate). Setting up a User is a two step process – adding their details to the WordPress Users list and communicating their login credentials. Once added to the list of Users there are options around communicating their Username and setting up a password.
This article describes the most robust way to achieve this. While it does involve a couple of extra steps it has been found to be less error prone.
Before you start
Be clear on the Role the User will be given – Administrator, Editor or Author.
It will help the User if they choose their Username. Email them and ask them for a Username of ten characters or more, to include upper and lower case letters plus digit(s). Dashes (-), period (.), underscores (_) and at sign (@) can also be used.
Input a User’s details
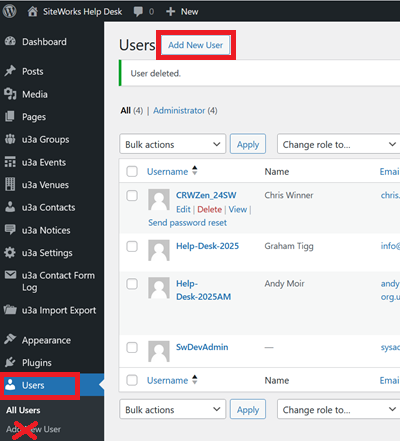
Navigate to the Users panel:

From the Dashboard menu select Users
Check the user hasn’t already been added, although they can have separate logins for different roles as long as they use a different email address.
Click Add New User
The Username cannot be changed, although a user can be deleted and added again.
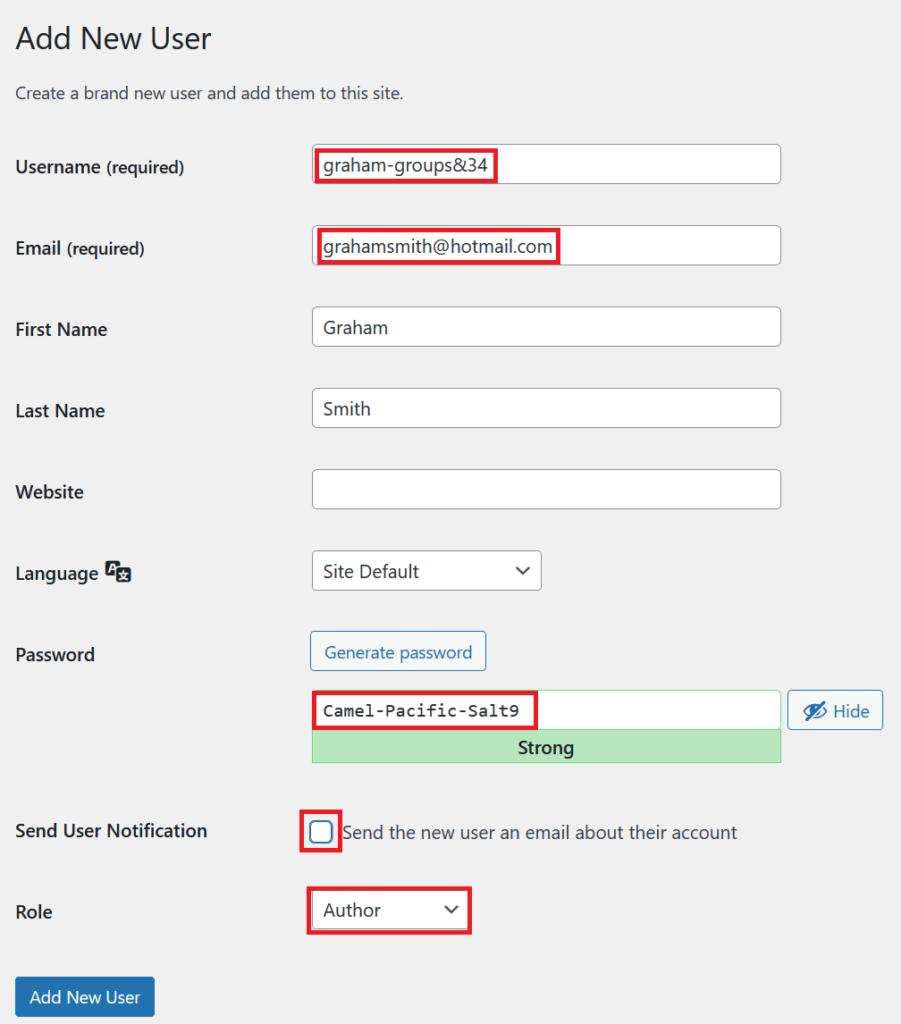
Add the Username having checked it complies to the rules above (10 characters or more, letters and digits).
The Email address must not be associated with another user.
Adding the user’s first and last name is obviously useful. Leave Website blank.
Using the WordPress generated password is fine but can be challenging for users who are not adept at copy/paste and on tablets/smartphones. Give the user a password and make a note of it. Make sure WordPress indicates the password as Strong. This requires 11 or more characters. Use at least one lower and one upper case letter, a number, and a punctuation character.
Make sure the Send User Notification check-box is clear as the email generated by WordPress is confusing and often gets treated as Spam. We are looking to hide this check-box in future.
Select their Role – Administrator, Editor or Author (note we don’t use any others roles you may see).
Click Add New User

Inform the new user
To keep the Username and password separate send the new user two emails:
- Inform them of their Username as above, the URL for them to login and explain that their password is to follow.
The URL to login is the URL of the site with /wp-login.php appended i.e. https://subdomain.u3asite.uk/wp-login.php - The second informs them of their password and that they must change it.
Here are suggested email templates. You need to change subdomain to that of your site and add a signature.
| Hi Graham, I have set you up as a SiteWorks user. Your Username is graham-groups&34 I will send your password in a separate email. To login go to https://subdomain.u3asite.uk/wp-login.php |
| Hi Graham, Your password is Camel-Pacific-Salt9 Login as soon as possible and change your password. On the top-right of of your screen click on ‘Hi, Graham Smith’ and select ‘Edit Profile’. Scroll down to ‘Account Management’ and click on the ‘Set New Password’ button. Make sure your password is Strong – as you enter your new password WordPress will indicate from Very Weak, Weak, Medium and finally a green Strong. Ignore the ‘Application Password’ section. Remember to click Update Profile to save your new password. There is more information in the User Guide https://siteworks.u3a.org.uk/docs including how to generate a three word password. |
