How to try SiteWorks on your computer using Local WP
Note that moving a site from Local WP to a Trust hosted SiteWorks site is not supported.
Instructions to copy a SiteWorks site to Local WP are available under the menu Web Manager > ‘how tos’ advanced topics
Follow ALL the steps 1 to 4 below carefully. If you encounter problems refer to 6 Troubleshooting before seeking help.
WordPress doesn’t have to run on the Internet. If you have a 64 bit computer running MacOS, Windows or Linux (but not an iPad, Android tablet or Chrome book) you can install WordPress on your own computer. This uses a product called Local WP, or just Local.
Web Managers receiving the training run by the SiteWorks Team will need access to a computer capable of running Local. Once live, Local will be invaluable to try things out or train colleagues to be future Web Managers. We will be recommending ways to clone your live SiteWorks site to make a private copy for training or to just try things out.
The steps covered in detail below are:
- Install the Local WordPress software for your computer
- Download the latest SiteWorks demo website zip file
- Start Local and import a website from the downloaded zip file
- Log in to WordPress and start exploring the website
- Other observations
- Troubleshooting.
Note that you cannot send emails from a contact form with Local.
1 Install Local WP
Pre-requisites – Local requires a 64 bit computer running MacOS, Windows or Linux. It will not install/run on a tablet, smartphone or Chromebook.
Download the software for your computer type from https://localwp.com/ and install in the usual way. Note this file is quite large – 500MB+
You will need to provide an email address to download the software, and will get a (very) few emails, but there is no need to create an account or provide your name or phone number.
Do pay particular attention to Local’s installation notes. For example, the more recent Apple macOS releases require software called Rosetta 2 to be installed. The install process will also cause your computer to ask for permission to allow Local to make changes.
On Windows then running Local WP as administrator has avoided problems. To do this right-click on ‘local’ download and then ‘Run as Administrator’.
2 Download and setup a demo site
The SiteWorks developers have created a demonstration WordPress site with the SiteWorks theme and plugins plus some fictional u3a example pages.
Download the demo zip file from https://u3a-llandrindod.org.uk/training/siteworksdemo.zip
Do not extract the files, only the single zip file can be used.
Safari macOS users note that the default is for the zip file contents to be automatically extracted. On Safari go to Preferences > General and un-check ‘Open safe files after downloading’. This link has screenshots for these steps.
Note that Local can host multiple sites so you can install more than one SiteWorks demo site plus even a standard WordPress installation.
3 Start Local and import the website
Launch Local on your computer.
One the bottom left of the Local screen click the + to create a site.

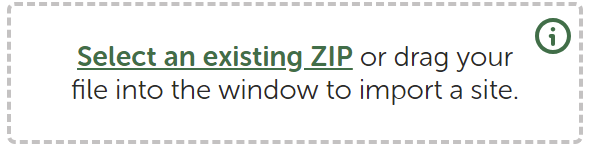
You should select or drag the siteworksdemo.zip file you downloaded in step 2.
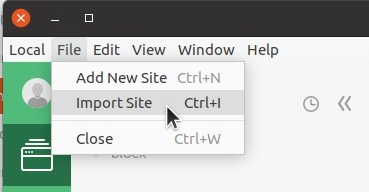
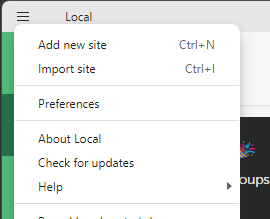
Note that on the File menu, Import site achieves the same result. On Windows and some computers it may be on a three-bar menu.
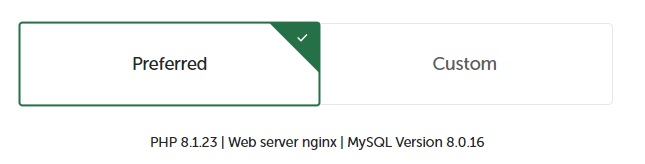
If you are given any choices during the software installation just go with the ‘Preferred’ default options rather than ‘Custom’.
Importing may take a while. It will usually ask if it can update your hosts file or make changes to your Computer – say YES. You may need to restart Local to see the site you have created listed.
You can of course create a completely empty site by selecting Add new site
4 Launch site and login to WordPress
After the website has imported you can launch the website.
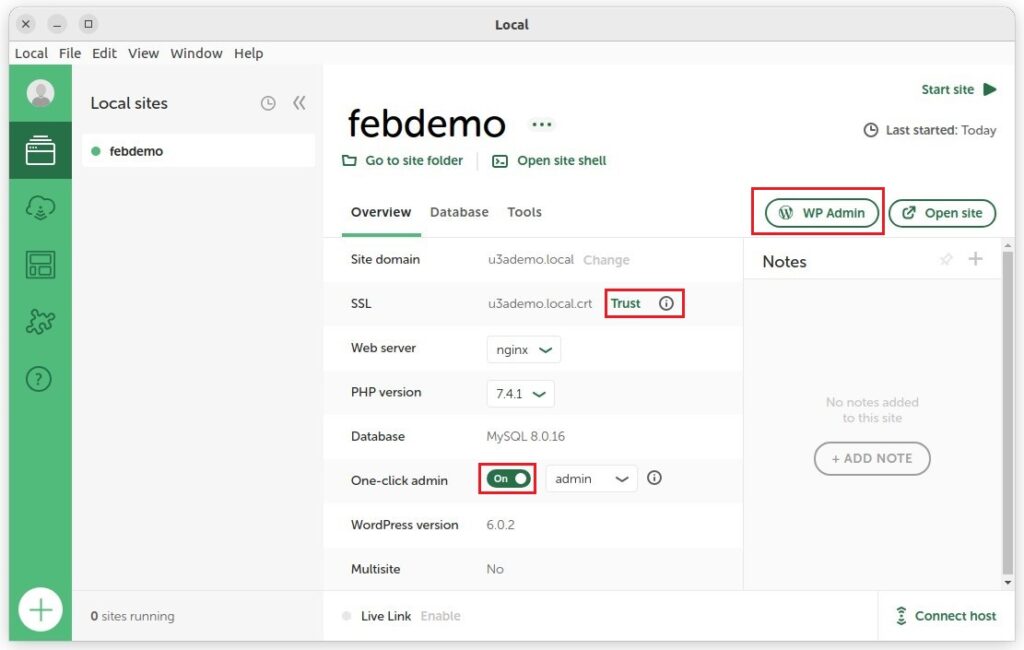
Turn on ‘One-click admin’ so you will not need to log in to use the WordPress admin dashboard.

You can view the actual website (Open site button) or to log in as the Administrator (WP Admin button).
Make sure the SSL setting is set to Trust.
At this stage if nothing appears to be happening then the chances are anti virus/malware such as Norton is preventing Local from proceeding. Try disabling them (note that Windows Defender is not usually the problem).
As an alternative to ‘One-click admin‘ for the demo site (not a migrated site) there is a pre-set WordPress administrator username/password of admin / 112233 (Both are case sensitive).
You need to keep Local running all the time you are working on the website. When you have finished work, you can close Local. When you restart Local the website will be as you left it.
If you want to ‘start again from scratch’, delete the demo website (right-click the site name under the heading Local Sites) and import a fresh copy of the .zip file. As Local supports multiple sites, you could also create an additional site and give it a different name.
Please note that the u3a demo website is a snapshot of the theme files, plugins and content at the point the zip file was created. While the zip file will be updated from time to time, you may still need to update the plugins manually.
Those interested in contributing to the development work can obtain the current versions of the theme and plugins from the repositories on GitHub. For access to the repositories please contact Nick Talbott through the u3a WordPress Development Forum giving your GitHub username.
5 Other observations
After installing the Demo site there will usually be a number of plugins that need updating. Go ahead and update them. Note that on your production site keeping SiteWorks plugins updated is managed centrally by the SiteWorks team.
If you see an error message REST API failed then ignore it. This is the u3a Plugin Main WP Child trying to communicate to SiteWorks administration – something it can’t do as Local WP is not centrally managed by the SiteWorks team.
Like most applications these days, Local WP will alert when a new version is available. This can be ignored unless you have been using Local WP for many months in which case consider updating at some stage.
6 Troubleshooting
The top issue encountered for Windows is anti-virus software stopping Local WP from communicating internally.
On macOS it is Safari extracting the content of the demo site zip file (see 2 above).
Connection not secure
This is not an error but the way Local WP works. Because Local is working entirely inside your own computer it does not use the complex to setup so called HTTPS connection from your browser to your Local WP site. Your browser does not know your Local WP site is on your computer so warns/blocks you.
Try re-install (but follow these instructions)
It is worth re-installing Local if things appear to get messed up or it appears to stop working after a period of not using Local. Several users have also experienced problems after Local has performed an update.
To re-install we recommend following this article that explains how to fully uninstall Local first (it covers Windows, Mac-OS and Linux).
Windows
Anti-virus products
Most problems seem to be down to anti virus/malware products. On Windows standard Windows Defender works fine, but other products such as Norton, McAfee are often pre-installed by the supplier of your computer. They either block access to the webserver port on your computer (a bit like not having enough electrical sockets in your kitchen), or prevent the hosts file being updated (the hosts file enables your browser to find your Local site on your computer and not head off to the Internet).
A symptom of this is messages such as ERR_TUNNEL_CONNECTION_FAILED, “Uh-oh! Unable to start site”
Allow Local WP to update your ‘hosts’ file
Local WP needs to update what is known as your ‘hosts’ file because it tells your browser to find Local WP sites on your computer and not to go to the internet.
When you import a site Windows may alert you with ‘Do you want to allow this app to make changes to your device?’. Click Yes. Local is appending information to your ‘hosts’ file. We have had reports of updating the ‘hosts’ file fails because the file has been set to read-only by anti-virus software. The start of this article explains how to change the attribute to read-write and has notes and various anti-virus products.
Page 404
If you have installed a zip file and find your get a “404” page on your site then try re-starting your computer.
This site can’t be reached and similar errors
This issue seems to effect some Windows 11 computers. It can be caused by another application on your computer using the ‘port’ that Local uses. It’s a bit like finding a road into town completely congested and having to find another route.
Try setting your Router mode.
Just to be sure, reinstall Local WP first.
Before loading the demo zip file, click on the three-bar menu (usually top left). Under Preferences > Advanced you will see Router mode. Change it to localhost and ‘Apply’. Click X to get back.
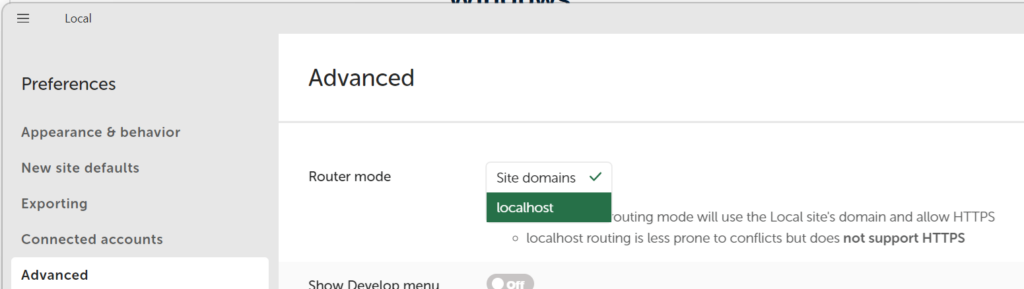
Now try installing your zip file (step 3 above).
Site is slow
If you find your site runs unacceptably slowly then try this change.
Click on the Local 3-bar menu and then Preferences > New site defaults
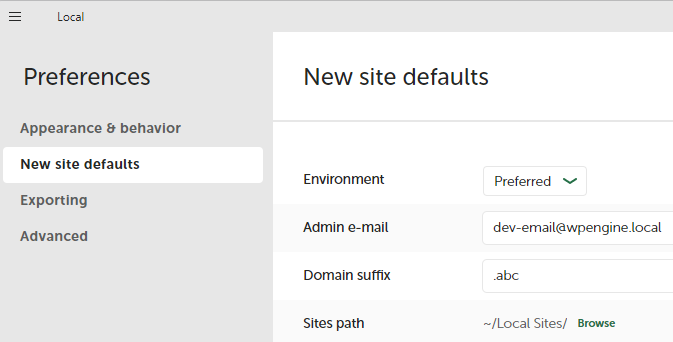
In the box “Domain suffix” you will see ‘.local’. Change it to something else e.g. ‘.abc’ as above and click on ‘Apply’. Now install a new or imported site. It seems the suffix ‘.local’ on Windows can slow things down dramatically as it conflicts with other services.
Need to install Windows components
A couple of users have needed to install Microsoft Visual C++. If this is missing Windows will often download it. If not there is information from Microsoft on how to do this here. Look for the X64 link.
The public Local Community forum can be a good source of suggestions. Take a look in their FAQ or search for your issue.
mac OS
Even though Mac OS is less common that Windows we have had few reports of problems where Mac OS has been mentioned. Fortunately one of the team is an experienced Apple user so try contacting our Help Desk (Contacts menu).