Introduction #
The CSV Import and Export plugin can be used to populate information in a SiteWorks site or, if required, export information. The extent of information which can be imported or exported is:
- Venue
- Contacts
- Groups
- Events
Information is imported from a set of industry standard comma-separated variable (*.csv) files – one for each type of information listed above. The files have a predefined structure as described below.
The CSV method is especially useful for a new SiteWorks site where information is available on spreadsheets. A SiteWorks Starter Site can be created and partially populated using the CSV import method.
Creating the CSV Files #
The common structure of all the CSV files is as follows:
- Row 1 must contain the header (column) names.
- The data rows must start in row 2 and there cannot be any blank rows within the rows containing the data.
- The four CSV files must be provided separately.
- If special characters are included, such as a £ sign in the Cost field of the Groups or Events file, the CSV file must be in UTF-8 format. See below for more details.
- The header names must be as detailed in the following tables and no other columns may be included.
The CSV files can be created manually, typically using Microsoft Excel. Alternatively, they can be created using the “Download Table as CSV” extension added to the Google Chrome web browser.
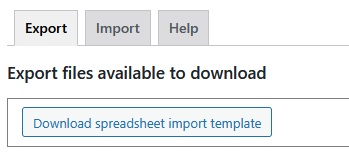
If the Beacon system is used then explore exporting content in Excel or CSV format. Some manual manipulation of data will be required to comply with the rules for import to SiteWorks. An import template for the CSV files can be downloaded from the u3aImportExport Dashboard menu item Export tab:
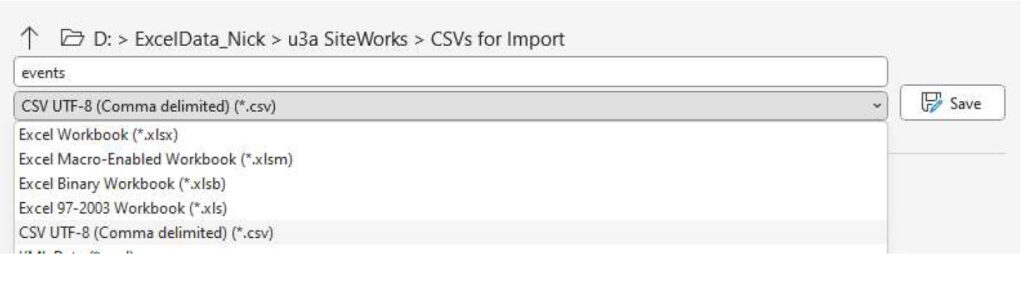
The downloaded file will be saved to the Downloads folder as defined by the web browser (typically under Settings). The template has tabs for each of the four data areas. Note that each tab will need be saved as a separate file before loading.
If the file needs to be in UTF-8 format, it is easiest to create it first in ordinary CSV format and then save it again as a CSV UTF-8 file. See the screenshot of the Excel Save As function and the file type options:
The rules for the structure and content of the CSV files are as follows:
Venues #
| Header_Name | Required? | Comment |
|---|---|---|
| Name | Yes | This becomes the title of the Venue’s form. |
| District | No | If this field is not empty in any row of the CSV file, the District checkbox in u3aSettings > Venues within SiteWorks must be checked, otherwise an error message will occur. |
| Address Line 1 | No | |
| Address Line 2 | No | |
| Town | No | |
| Postcode | No | |
| Accessibility | No | |
| Phone | No | |
| URL | No | URL must include either the http:// or https:// prefix or a syntax check will fail. |
Contacts #
| Header Name | Required? | Comment |
|---|---|---|
| Name | Yes | |
| Membership no. | No | |
| Given | No | |
| Family | No | |
| Phone | No | |
| Phone 2 | No | Note the space between Phone and 2 |
| No | A valid email address or blank. |
Groups #
| Header Name | Required? | Comment |
|---|---|---|
| Name | Yes | |
| Status | Yes | Must be one of the following, either the exact long form or the short form enclosed in [ ] are both valid (do not include the []): Active, open to new members [Active] Active, not currently accepting new members [Full] Active, full but can join waiting list [Waiting list] Temporarily inactive [Dormant] No longer meeting [Closed] |
| Category | Yes | Must be an existing Group Category within SiteWorks. Multiple categories are permitted, which must be separated by |, the vertical bar character (e.g History|Art) |
| Day | No | Must be: Monday, Tuesday, Wednesday, Thursday, Friday, Saturday, Sunday or blank. |
| Time | No | Must be: Morning, Afternoon, Evening, All Day or blank |
| Frequency | No | Must be: Weekly, Fortnightly, Monthly or blank. |
| When | No | Free text |
| Venue | No | Must be an existing valid venue title (top of the venue’s form), or blank. |
| Start time | No | Must be in HH:MM, 24 hr format. |
| End time | No | Must be in HH:MM, 24 hr format. |
| Coordinator | No | Must be a valid contact already present within SiteWorks or blank. |
| Coordinator_2 | No | Must be a valid contact already present within SiteWorks or blank. If this field is not empty in any row of the CSV file, the Second interest group coordinator checkbox in u3aSettings > Groups within SiteWorks must be checked, otherwise an error message will occur |
| Deputy | No | Must be a valid contact already present within SiteWorks or blank. If this field is not empty in any row of the CSV file, the Deputy checkbox in u3aSettings > Groups within SiteWorks must be checked, otherwise an error message will occur. |
| Tutor | No | Must be a valid contact already present within SiteWorks or blank. If this field is not empty in any row of the CSV file, the Tutor checkbox in u3aSettings > Groups within SiteWorks must be checked, otherwise an error message will occur. |
| No | Must be a valid email address or blank. If this field is not empty in any row of the CSV file, the Group email checkbox in u3aSettings > Groups within SiteWorks must be checked, otherwise an error message will occur. | |
| Email2 | No | Must be a valid email address or blank. If this field is not empty in any row of the CSV file, the Second group email checkbox in u3aSettings > Groups within SiteWorks must be checked, otherwise an error message will occur. |
| Cost | No | If this field is not empty in any row of the CSV file, the Cost in u3aSettings > Groups within SiteWorks must be checked, otherwise an error message will occur. If a £ sign is used, the import file must be in CSV UTF-8 format or an error will occur. |
Events #
| Header Name | Required? | Comment |
|---|---|---|
| Name | Yes | |
| Category | Yes | Must be an existing event category within SiteWorks. |
| Date | Yes | The format must be YYYY-MM-DD. See the WARNING below regarding Excel. |
| Time | No | Format must be HH:MM or blank. |
| End time | Format must be HH:MM or blank. | |
| Days | No | Must be an integer value or blank. |
| Group | No | Must be an existing group category within SiteWorks or blank. |
| Venue | No | Must be an existing venue within SiteWorks or blank. |
| Organiser | No | Must be an existing contact within SiteWorks or blank. |
| Cost | No | if a £ sign is used, the import file must be in CSV UTF-8 format or an error will occur. |
| Booking | No | Must be Yes, Y, No, N or blank. |
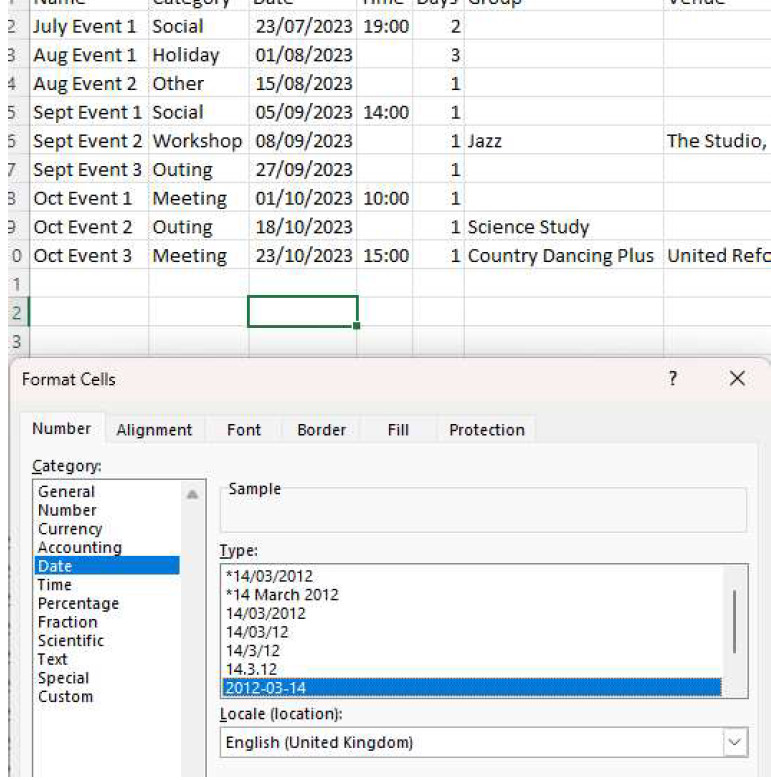
WARNING: If in creating the Events CSV file in Excel, checks should be made to must ensure the Date format is correct. In the UK, Excel will typically save the date in DD/MM/YYYY format. However, this format can be changed to YYYY-MM-DD using Format Cells ⇒ Date ⇒ 2012-03-14. See the screenshot below:
Save the file as a CSV file or CSV UTF-8 file. DO NOT open the file again within Excel because the date format will be overwritten back to the DD/MM/YYYY. To be certain that the date format is correct before import to SiteWorks, you can open the CSV file using a text editor such as Notepad to ensure that the date format is correct.
WARNING: The ‘Name’ heading corresponds the the Title when viewed in from the Dashboard menu. If the ‘Name’ (Title) already exists then data for ALL the other headings will overwritten with the values in the import file row. This includes empty values.
For Events there is an option to create new Events when the name matches (see below).
Importing CSV Files into SiteWorks #
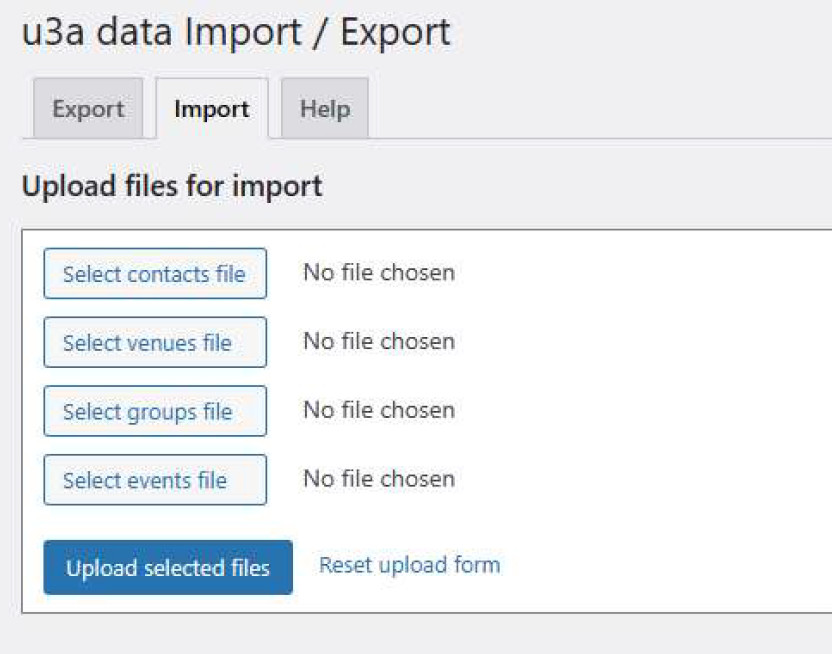
Use the u3a ImportExport plug-in included with SiteWorks. Choose the Import tab:
The CSV files MUST be imported in this order: Venues ⇒ Contacts ⇒ Groups ⇒ Events. The reason for this is that Groups depend on entries already imported from Venues and Contacts. Events also depend upon entries imported from Groups, Contacts and Venues.
For instance, if you wish to import the Venues CSV file, use the Select venues file button and choose the correct Venues CSV file, typically on your local hard drive. Then click on Upload selected files.
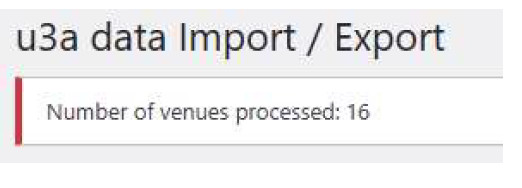
If there are no errors in the import file, then the screen for a venue file will be as below:

Click the Import files into WordPress button and the entries in the CSV file will be imported into WordPress and will show under u3a Venues. The number of entries successfully imported will also be shown:
Open u3a Venues and check that the imported entries all look correct.
If there are errors in the import CSV file, they will be detailed in plain English (with the row number where appropriate) after the Upload selected files button is clicked. These errors will need to be corrected before the file can be imported.
An example error message is shown below:

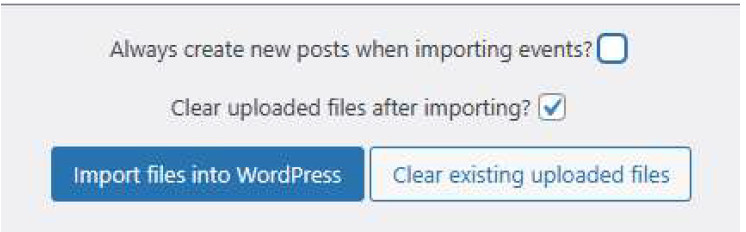
When you are importing Events, after the file is successfully uploaded, note the “Always create new posts when importing events?” Checkbox.
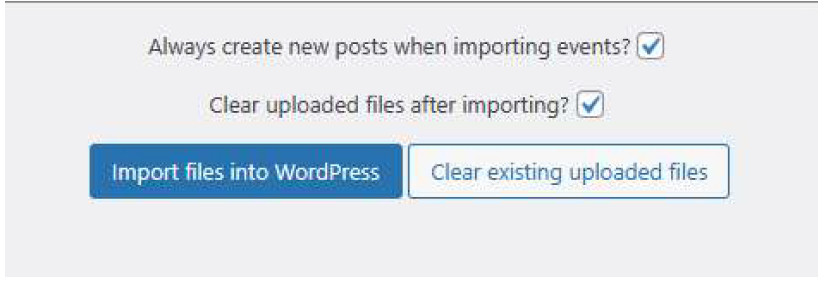
By default this checkbox is checked. If you are importing any time after the first time, this will lead to duplicate events being created. In most cases, this checkbox needs to be unchecked unless you are sure that you want to import duplicates.
Exporting CSV Files #
It is also possible to export Venues, Contacts, Groups and Events from SiteWorks in CSV format. This can be useful if changes to a lot of entries are required. It is far quicker to bulk edit in Excel than it is in SiteWorks. The revised file can then be re-imported back into SiteWorks.
First, it is necessary to update the export files using the Generate New Export Files button. If you do not do this, the Export files may not match the SiteWorks entries if SiteWorks has been modified since the Export files were last updated. Check that the date and time shown in the “Generated” message show the very recent past.
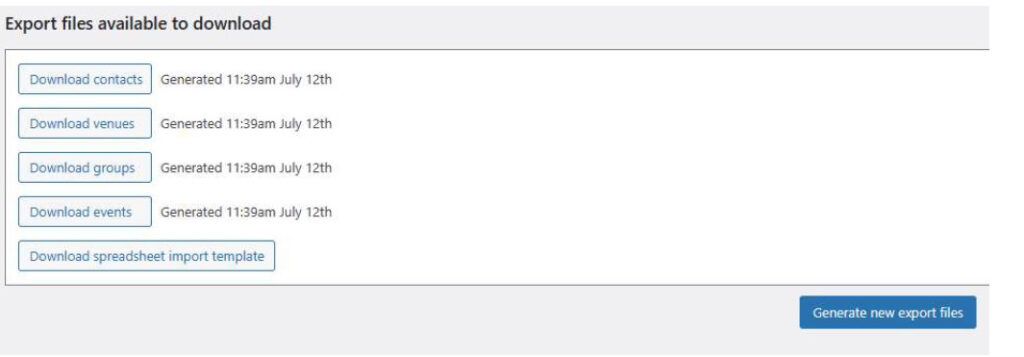
Then choose the file to be downloaded (exported): Venues, Contacts, Groups or Events. When exporting, it does not matter in which order the exports occur.
If, for example, we choose to export Events, a pop-up message thus will occur:
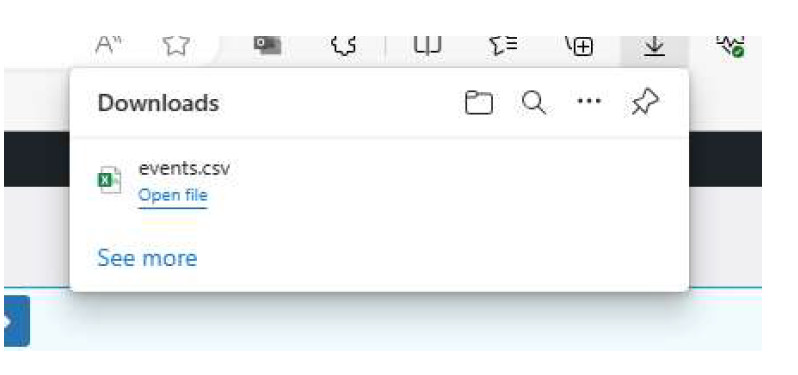
The file name is predefined as “events.csv” (or venues, groups or contacts as appropriate). The downloaded file will be saved to the Downloads folder as defined in the web browser you are using (typically under Settings). Using your file manager you can move this file, rename it etc as required.
If we look at the contents of the events.csv file:
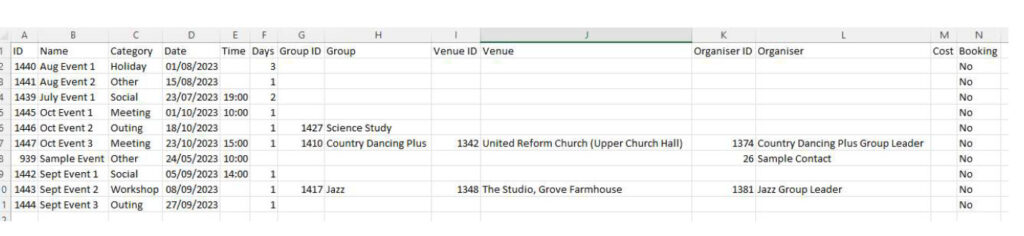
Note that the first (most lefthand) column contains a numerical ID. This applies to the entire row. Note also that Group, Venue and Organiser also have their own numerical IDs. These unique ID numbers are assigned automatically by SiteWorks and will always be integers.
The other export files also use IDs against various fields (immediately to the left of the relevant field).
Re-Importing CSV Files #
DO NOT change IDs in column 1 other than to delete them completely where required as described below. These ID fields are used to tell the Import process whether to update an existing entry or, if the ID is deleted, create a new entry.
Also do not use CSV files exported from other SiteWorks sites, including Local WP, as the IDs will not match and data could be overwritten.
There are two updates that can be done:
Adding a Complete New Entry #
To add a new entry, obey the same rules as detailed for Imports under Section 2. Fill in all required fields for the new entry but leave the ID fields blank. The ‘Name’ (Title) will need to be unique otherwise a matching entry will be updated. The exception to this is for Events when ‘Always create new posts’ is ticked.
Import the revised file again using the same procedure as in Section 2.
Changing the Entry Name or other fields #
Edit the Name as required (for example ‘Bridge’ to ‘Bridge 1’) and any other fields. Leave all ID fields unchanged. When the file is imported using the same procedure as in Section 2 the entries corresponding to the IDs will be updated by overwriting the fields.
Using the ID is the only way Import can change the name of an entry. Also an Import cannot delete (Bin) entries, do that using the SiteWorks Dashboard menu.
Revision History #
| Initial Version | 19/02/2023 | Author Nick Amery Uploaded: Richard Crowder |
| Minor updates | 09/12/2024 | Richard Crowder |
| Corrected Header names and remove Site Builder references: | 27/03/2025 | Graham Tigg |
| Clarified the way Names and IDs are used. | 11/02/2026 | Graham Tigg |


