Introduction #
There are two entities within the WordPress environment that users can create and edit:
- Pages are sometimes called Static Pages because they usually have fixed content once created. Pages are hierarchical and organised as child and parent pages, accessed through the menu structure.
- Posts are different to Pages as they use categories and tags, together with a query loop to publish. When a post is published, it appears immediately at the query loop’s location as defined by its category and tag.
This user guide discusses the initial steps required to create a Post. The key element of a post is the use of Categories and Tags.
- Categories are the most general method of grouping content on a WordPress site. A category symbolises a topic or a group of topics that are connected in some way. For a u3a this could be a Group, Committee Meeting Minutes, etc. Categories can be organised as a hierarchy.
- Tags are an approach to identifying a piece of content by some specific terms, which are presented as a comma-separated list. In addition, WordPress has a Tag Cloud block that permits all the tags to be viewed; this feature is discussed here.
Hence, a category indicates the broad genre of the post, and with tags provides a level of granularity as required; for example, you could have Book Club as a category with the associated tags of Novels, Biographies, etc. In practice, this will allow a group leader to add a short review about a recently read book, which will be immediately published on the Book Clubs page.
To publish a post, three actions are required;
- A list of categories needs to be developed.
- A Query Loop needs to be created on the web page where the post is to appear. The query loop determines which post and how that post is to be presented at a specific location.
- The post needs to be created, edited and published.
Creating a Category #
Before creating any Post, it is good practice for the required Categories to be defined, as this is used by the query loop filter, to ensure the Post is displayed in the correct location. WordPress has a default Uncategorised category, but it is not recommended for u3a use.
It should be noted that if the Category does not appear in theQuery Loop filter list, the corresponding Post will not be displayed.
On the Dashboard, select Posts ⇒ Categories to add a new Category. The displayed screen allows you to enter the required information to create a new category:
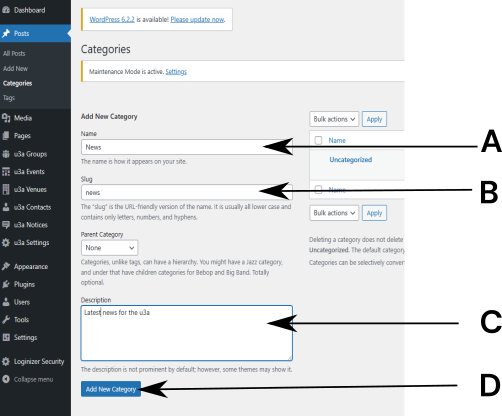
To create a new category:
- Enter the name of the new category, A, in this case, News.
- The slug will be automatically generated from the category name on saving.
- Enter a brief description if required at C.
- Save using Add New Category (D). Information regarding the new category will then appear in a list to the right of the above screen.
Unlike tags, categories can be hierarchical to aid the indexing and display of posts.
Creating a Tag #
Creating a tag is identical to that of a category. From the Dashboard, select Posts ⇒ Tags to add a new tag The displayed screen allows you to enter the required information to create the new tag. Select Add New Tag to save the new tag. Information regarding the new tag will appear in a list to the right of the screen.
Tag Cloud #
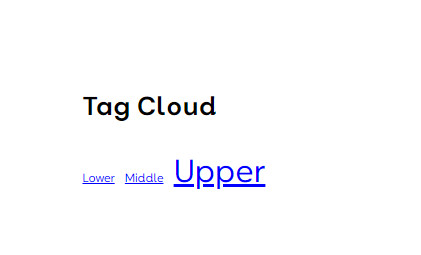
The Tag Cloud block displays the relative number of posts with a specific tag, by font size (i.e. the more posts with a particular tag, the larger the font). Displaying posts with a specific tag is achieved by clicking on the tag’s name. If the five posts, with three tagged as Upper, the resultant Tag Cloud is:
Creating a New Post #
From the Dashboard, select Posts ⇒ Add New and a form allowing the creation of a new Post is displayed:
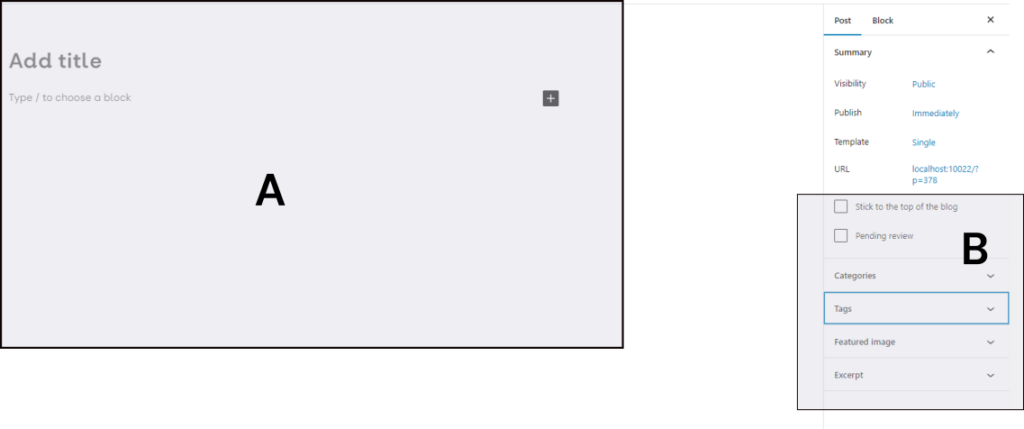
In the area labelled A on the screen, enter the title to be used when the post is displayed. Use the Block Editor to create the content, including text, media, or links as required.
To ensure that your post appears in the correct location, categories and tags need to be provided; this is done in the lower-right area of the screen, identified as B in the figure above. The process is as follows:
- If the Stick to top of blog option is selected, the post becomes sticky and always remains at the top of the list, with later posts appearing below it (this generates what is termed a sticky post).
- A Pending review option is available if required, for unpublished posts.
- Select Categories and select those relevant to the post. You can, if required, select multiple Categories so that the post appears in more than one location on the u3a website.
- Type the required tag into the Tags box. If the tag is already present, the entry will auto-complete; if not, the entry will be added to the tag list. A list of comma-separated words will form the tag list.
- An option exists to display a Featured Image; this may be shown alongside the post, depending on the Post template that you have used. This image is separate from any images that appear in the Body of the Post.
As with a Page, on completion, or during the editing process, the post can be:
- Saved as a draft using Save Draft
- Using Preview, the page creator can see how the post will appear on a desktop, tablet or mobile device.
It is possible to place a Post into one of three states, from the Quick Edit option:
- Published, as discussed above.
- In the context of SiteWorks, a Post in Draft and Pending Review can be considered identical. If a post is placed in these states, it can be edited by the page creator without being seen by a visitor to the site.
The number of Posts in all states is given in the list at the top of the All Posts screen. Selecting Draft or Pending will give a list of all Posts with that status.
Selecting a Specific Post #
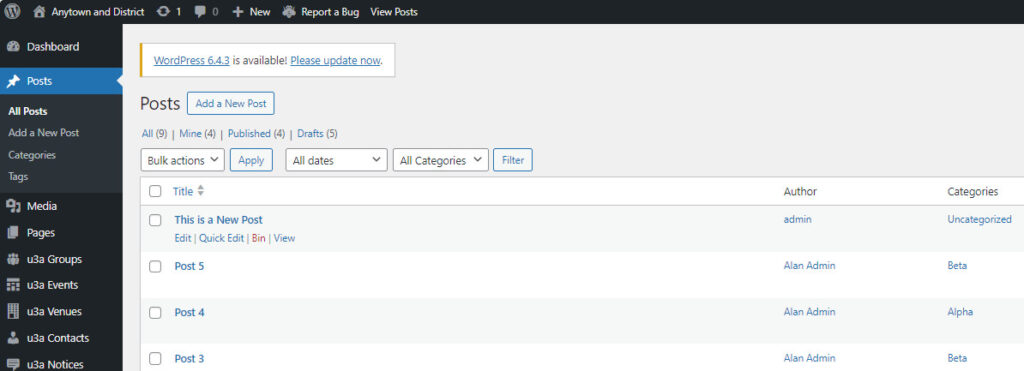
To select a specific post for editing, select Post ⇒All Posts from the Dashboard. This will display all the posts on the site (or the first ten if there are more than ten posts), and when the mouse is near the name of the post to be edited, WordPress displays the following editing options:
- Edit to edit the contents of the post, as discussed below.
- Quick Edit allows editing of the post title, other post properties, and the author. While the post title can be changed, the slug must not be changed, as this may result in display issues.
- Bin. Moves the post to the Bin, effectively deleting it from the site. However, it is possible to recover the post if the Bin option was inadvertently selected:
- If you have not moved from the post, select Undo.
- If Undo is not available, select Bin, and while hovering over the post’s name on the Bin page, select Restore. On restoring the post, it will need to be republished.
- View renders the page as seen by a visitor; note that this does not publish the page.
- View renders the post as seen by a visitor; note that this does not publish the post.
Editing an Existing Post #
To open a page for editing:
- From the Administration Tool Bar, select Edit Post, if you wish to edit the currently visible post, this is termed the Site View approach.
- From the Dashboard, select Posts ⇒ All posts to open a list of all the posts on the website.
- From the options available when the user hovers the mouse over the page name, select Full Edit, as noted above.
Once selected, the post can be edited using the block editor.
During the editing process, it is recommended that you select Save Draft regularly to prevent the loss of any work.
If the post is being updated, on completion of editing, the post is updated by selecting Update. No checks or confirmation is required, and the URL will not change. It should be noted that unless Draft or Pending Review is selected, the changes will be immediately visible upon updating. Updating also permits the publication date to be modified.
Featured Image #
A Post in WordPress can have a Featured Image, which can be added using the option available in the creator’s Post sidebar. One possible use of a Feature Image is to allow the page visitor to identify group-related posts quickly or differentiate between meetings and social events. The Featured Image is subject to the following limitations.
- It is not part of the Post’s content and will only appear when the Query Loop includes the Post Featured Image Block.
- The Widgets for displaying groups and events do NOT include the ability to display a featured image.
Publishing a Post #
After editing is completed, the Post can be published if it is new or updated if it already exists.
Before publishing, the following options can be set:
- From the right-hand side of the screen, select and change the Post Summary options as required:
- Visibility – options include Public, Private and Password Protected.
- A Public post is visible to all site visitors.
- A Private post can only be viewed by Administrators and Editors.
- A Password-protected post requires a password to view. The password is set when the post is first published. The drawbacks of using password protection are identical to those of a page, as discussed here.
- Visibility – options include Public, Private and Password Protected.
Publishing Immediately #
In the Post summary sidebar, ensure Publish is set to Immediate, then select Publish. WordPress conducts several internal checks and then requires a confirmation to publish.
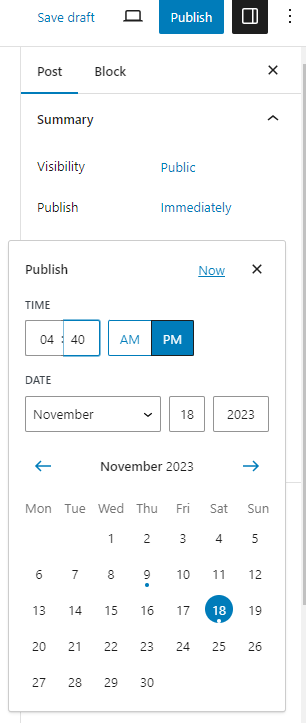
Scheduling a Publication Time and Date #
Select Immediately next to publish, this will bring up a calendar, where the publication date can be set. Once set, click anywhere on the post to close the calendar. Note that the Publish button is changed to Schedule. To publish at the set time, select Schedule, and after WordPress has conducted its check, re-select Schedule.
Post: Quick Edit #
Selecting Posts ⇒ All Posts from the Dashboard, allows all posts to be viewed. If Quick Edit is selected, the post’s status and name can be changed:
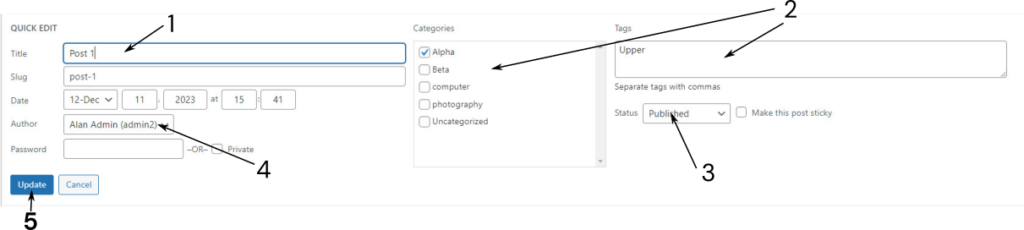
- Enter a new name if required. Note that the content creator should not change the slug.
- Change the associated Categories and tags
- Change the status of the post from Published to Draft. or Pending Review. If changed from Published,, the post will not appear in any query loop.
- Change the content creator who can edit the post.
- Update once the changes have been made.


