Introduction #
This user guide covers the main Events page and individual event pages, including how they are edited, indexed, and displayed. It is assumed that the u3a’s Administrator has entered and verified all the required information, including venues, contacts, and group categories, as discussed in the Entering u3a Specific Information guide.
A list of events can be displayed on any page using the u3a events list widget or associated Shortcode. All events will be listed unless a specific event is explicitly linked to a group during its creation, and the Exclude group events flag on the Event Settings page is set, as discussed here. The event setting also allows changes to the event times and date display formats.
Main Event Page #
Visitors can access event information by selecting Event from the main Navigation Menu. This page is provided within the Starter Site distribution. To edit this page, select Pages ⇒ All Pages ⇒ Events from the Dashboard. Depending on the individual u3a preferences, the page can be renamed, e.g.What’s On.
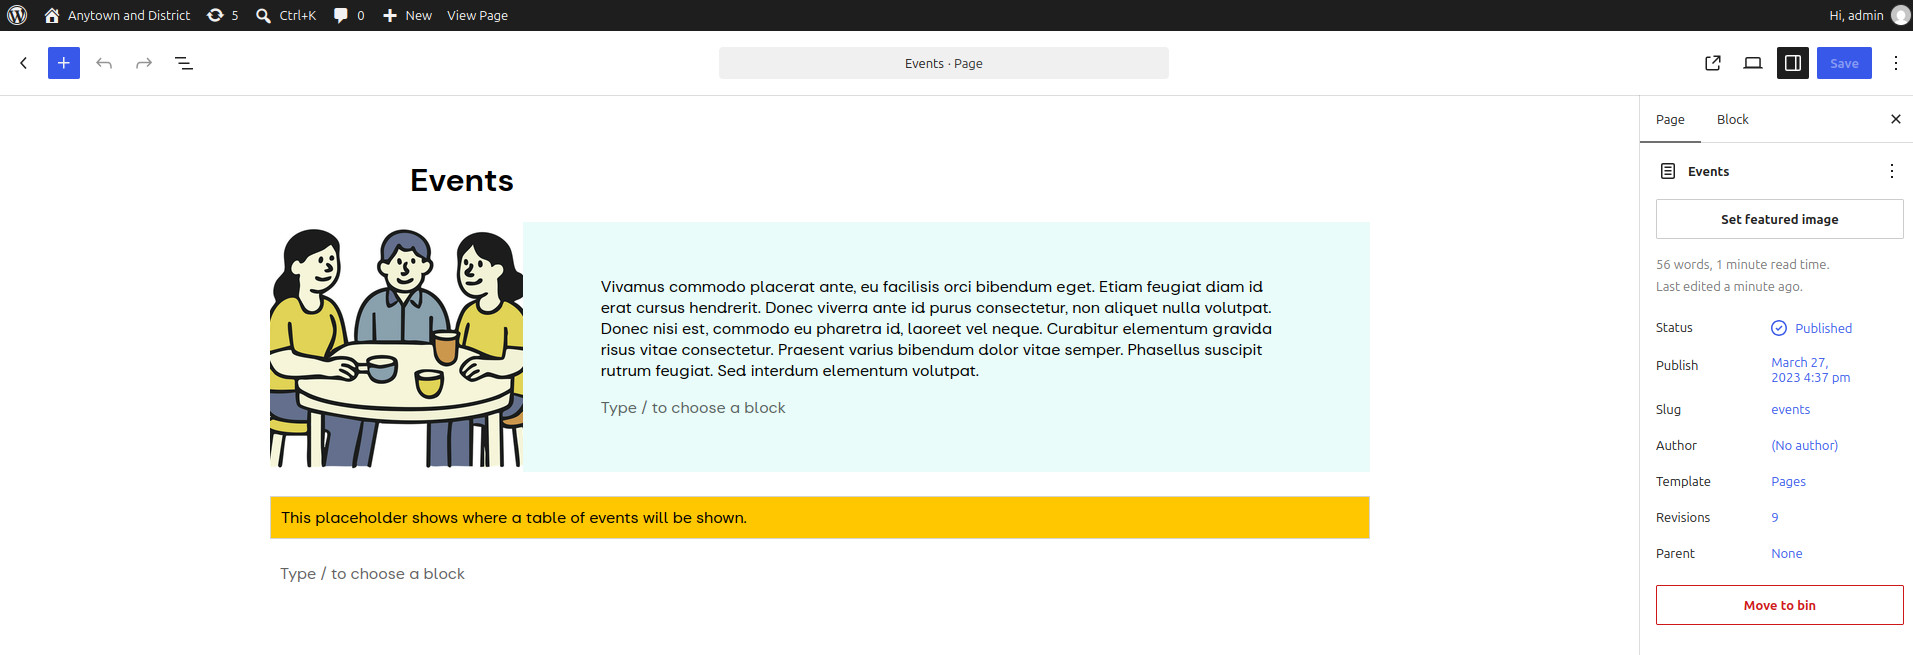
A typical top-level event page during editing is shown below. Note the inclusion of the u3a events list block (note the background colour of the Widget may change as various options are selected) :
The above will give the following to a page visitor. The event listing can be configured as discussed here.
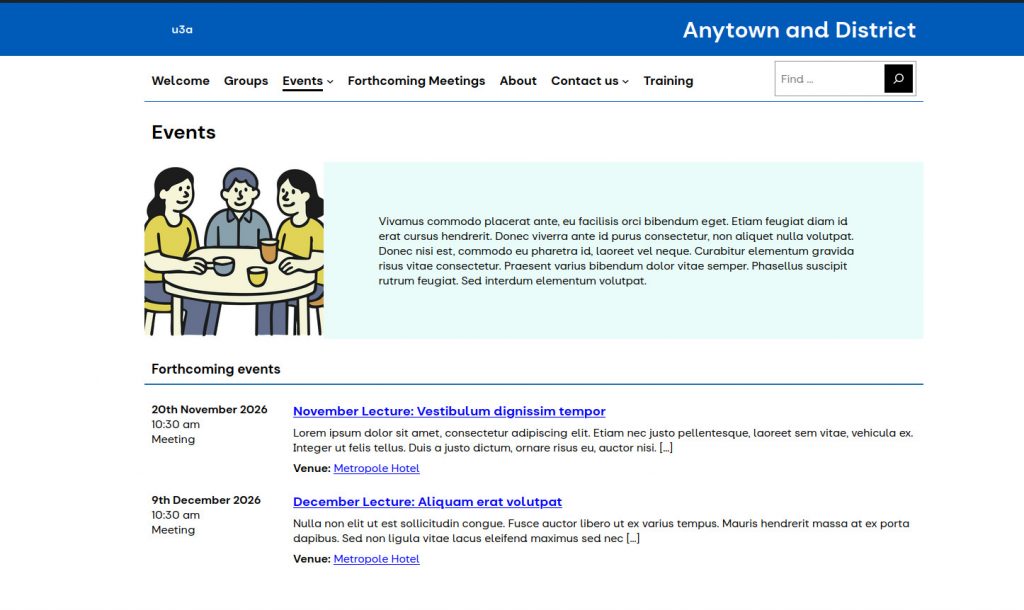
The meeting description is either an extract of the text added when the event was created or a specific piece of text entered separately, as discussed here. The page visitor can select the blue link or the image to view more information about the event.
Adding a Specific Event #
The following details are required:
- The name of the new Event (mandatory).
- The event category (mandatory).
- Times, cost and venue details
- Description as required.
An event page consists of two components: (i) information regarding the event’s location, cost, time, etc. (this is technically the event’s metadata, which is displayed through the use of Meta boxes) and (ii) a descriptive text area where the event’s organiser describes the event.
Entering the Event’s Metadata. #
The Meta Boxes are located at the bottom of the screen below the descriptive text; if they are not visible, select the caret at the bottom of the screen, as discussed here. The Meta boxes can now be filled as discussed below:
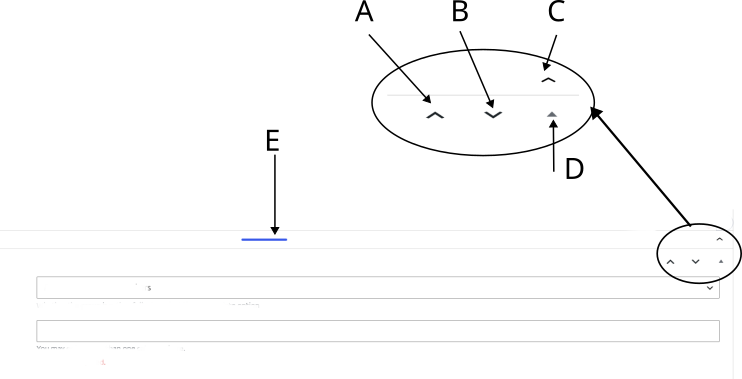
The view above allows the events information to be entered when the Meta boxes are at the bottom of the screen. Changing the view is achieved by using the chevrons and arrowheads at the bottom right as follows:
- A is inoperative in this view.
- B moves the Meta boxes to the sidebar.
- C hides the Meta boxes from view; the view can be recovered by selecting the inverted caret at the bottom of the screen to the right of “Meta boxes”.
- E is a drag bar that allows the content creator to view more meta boxes as required (note the bar is grey when not selected, and blue when selected..
When the Meta boxes are placed in the right-hand sidebar, the following view results:
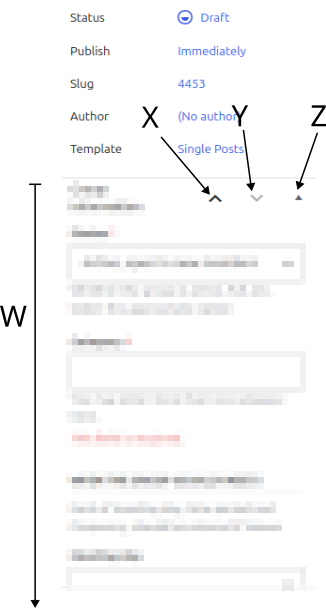
- W is the Event information; the content creator will need to scroll down to locate all the options.
- The two arrowheads and caret provide the following options:
- X returns the Meta boxes to the bottom of the main screen
- Y is inoperative in this view.
- Z hides/reveals the Meta boxes in the sidebar.
To complete the metadata:
- Enter the Event Date and Event Category for the event; these fields are mandatory. The event category can be selected from the pull-down menu.
- In addition, the following optional information can be provided:
- Start time of the meeting and its duration (in days). If no duration is added, the event is removed from the list following the day of the event, or if a duration is added, the event is removed from the list following the completion of the event.
- Group: allows an event to be assigned to a specific group. If the event is open to all members (e.g. a Speaker Meeting), the option should be left blank.
- Venue and Contact from the associated populated lists.
- A flag can be set to indicate if a prior booking to attend an event is required.
Entering Event Details #
The descriptive text is entered in the normal manner into the screen shown below:
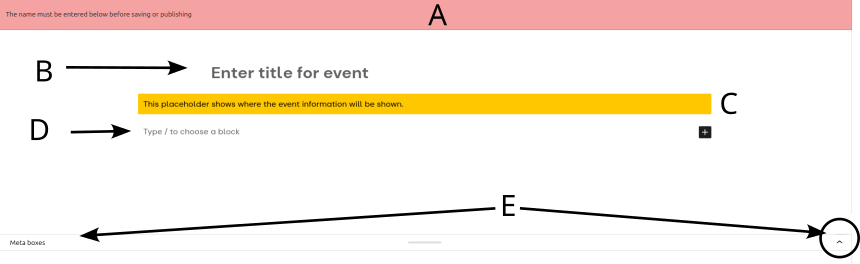
- The mandatory information must be entered to clear the error message.
- Title of the Event
- Event information will be displayed where this yellow widget is placed. This information is drawn from the event information regarding location, cost, status, etc., stored in SiteWorks, which is populated as the event is created.
- Descriptive text and images can be entered at this location.
- If the Meta boxes are not visible, the data can be accessed by the inverted caret (∨) in the lower right-hand side of the screen, opposite the Meta boxes label. NOTE: If this is not visible, ensure that the screen is fully scrolled to the bottom of the view.
Once the event’s data has been edited and saved using Publish, it will be displayed as an event page.
Optional Text in the Event List #
Depending on the individual u3a’s requirements, the text visible to the site visitor in the events list can either be an extract from the main text entered in area D above, typically the first 55 words or specific text. This text is added as follows:
- From the Event Sidebar, select Add an Excerpt
- The Excerpt block is displayed, where text can be added.
- Excerpts must not contain embedded information, i.e. links or shortcodes; see here. Hence, copying and pasting text should be avoided.
- The text can be edited or deleted at a later date.
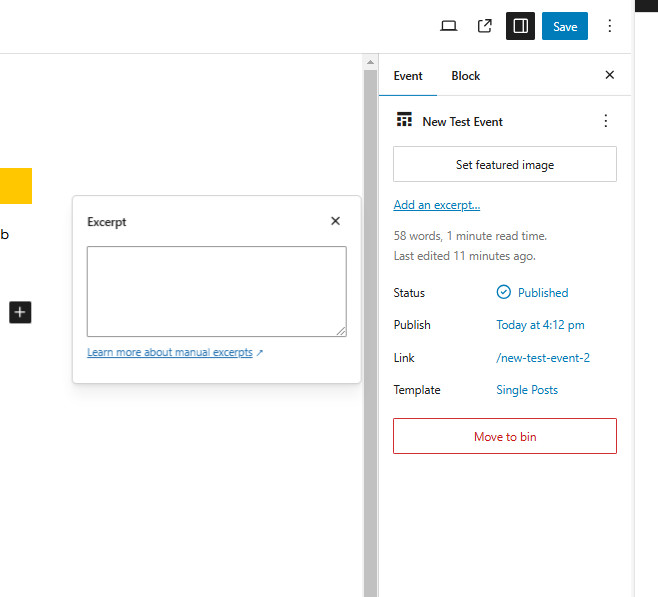
If a separate excerpt is added, the full event information and the entry in the event list will be different:
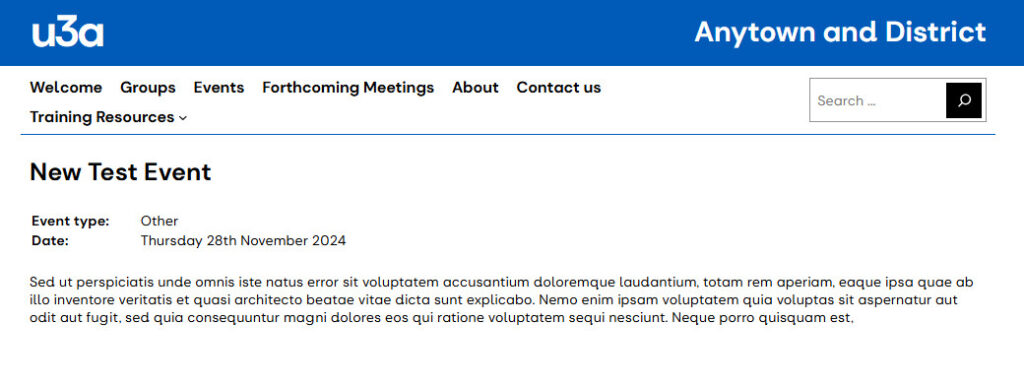
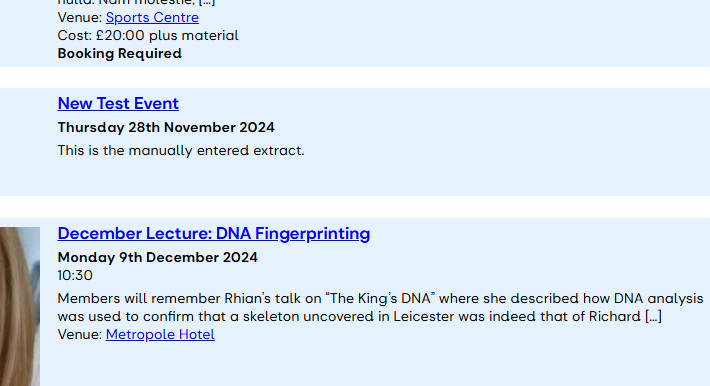
The Event page shows all the details.
The Event Listing shows the entered extract.
Adding a Repeat Event #
In many cases, a content creator will need to add recurring events, such as monthly speaker meetings. While each occurrence could be added individually, the facility is available to generate a sequence of events.
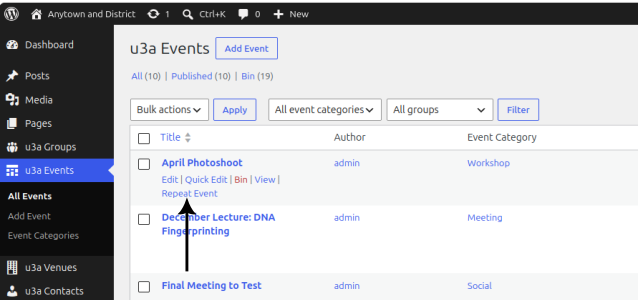
To repeat an event, from the dashboard, select u3aEvents ⇒ All Events, then hover over the event to be repeated, and select Repeat Event:
Once selected, the content creator has to define how many repeats are required and the associated time frame:
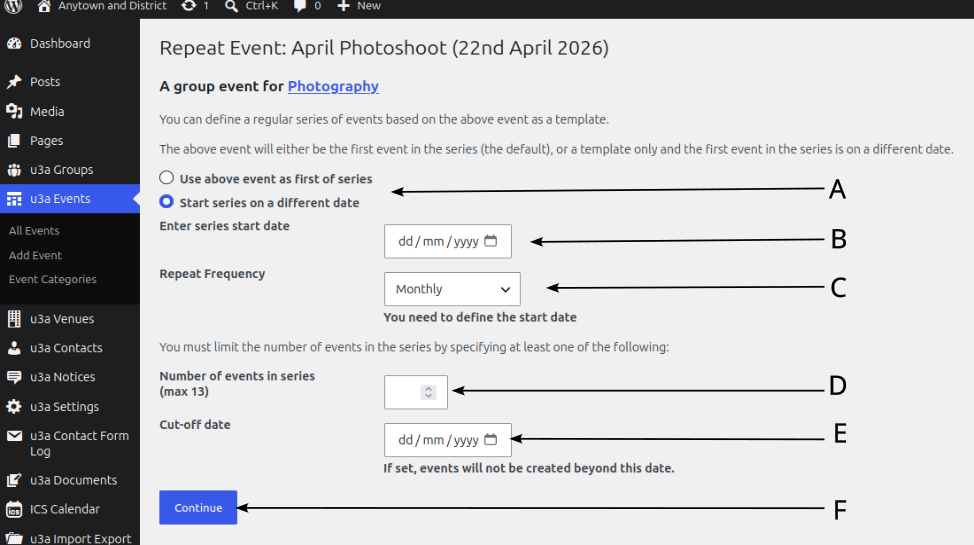
- Select the start date of the repeated events either from the existing event or from a new start date.
- Enter the new start date if required.
- Select the repeat frequency (Weekly, Fortnightly, Monthly, or Twice Monthly)
- Select the number of events in the series; the maximum is 13, including the current event, and if required
- A cutoff date.
- Once all the data is entered, select Continue.
Once Continue has been selected, the generated sequence of events can be edited:
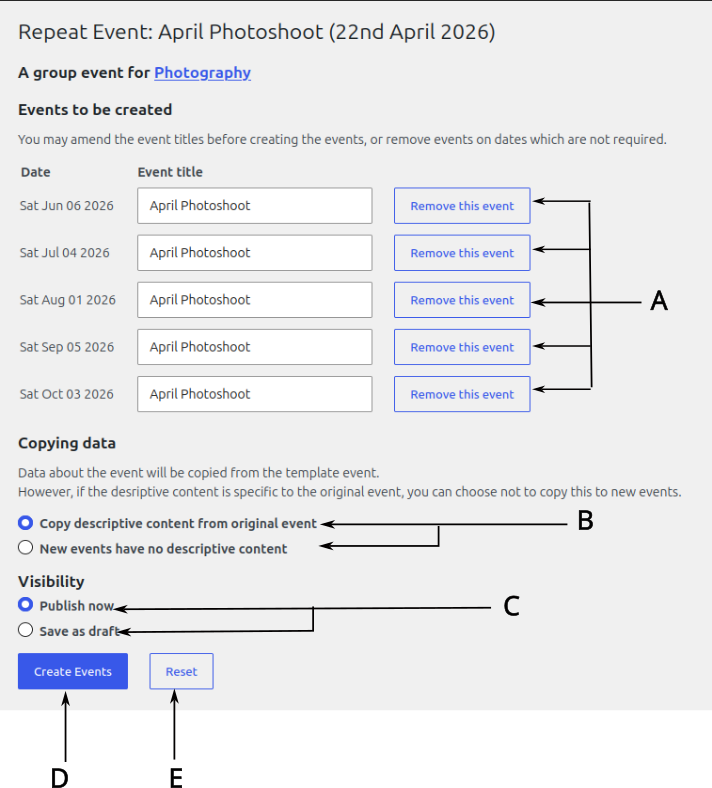
- The generated list of repeat events shows its date and title. At this stage, the event title can be modified, and if required, an individual event can be deleted, if, for example, the event falls on a bank holiday.
- It is possible to select whether the original descriptive data is copied to the new events. Irrespective of the option selected, the original metadata is copied across with a date change.
- The visibility can be selected, with all the new events being published or stored as drafts for later detailed editing. If the event is saved as a draft, it can be published after editing via the All Events page, as discussed here.
- Once the options are correct, the new events can be created.
- If an error is found, selecting Reset will return the content creator to the previous page.
Displaying a List of Events #
As discussed above, the u3a event widget provides a list of events. To enhance the Website, the u3a events list is configurable by using the following options, which will be visible in the right-hand sidebar under Block.
- Sort and Filter
- Category Selection
- Limits
- Layout Choise
- Advanced
Sort and Filter #
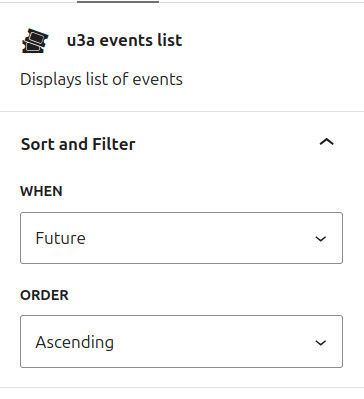
Allows the display of future or past events by date, in either ascending or descending order.
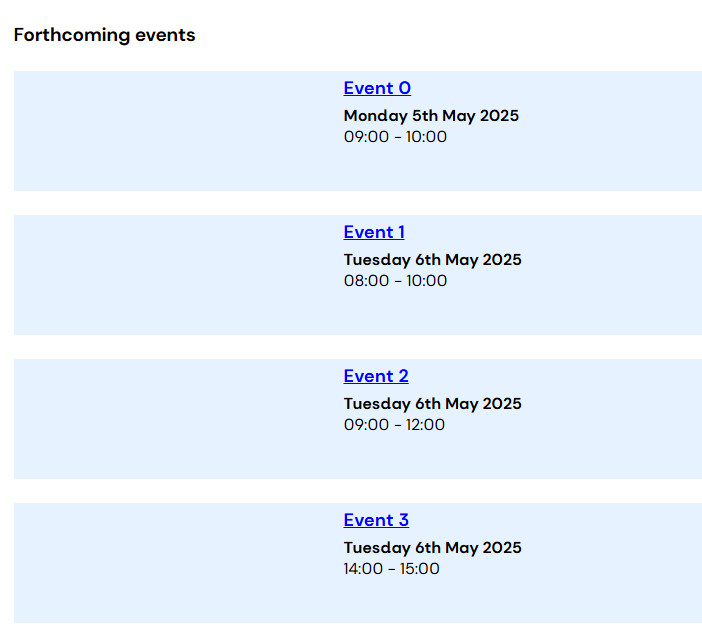
In displaying a list of events, the sorting precedence is defined as:
Date ⇒ Start time ⇒ End time ⇒ Publication Date
This approach will give the conventional listing of events as shown below:
Category Selection. #
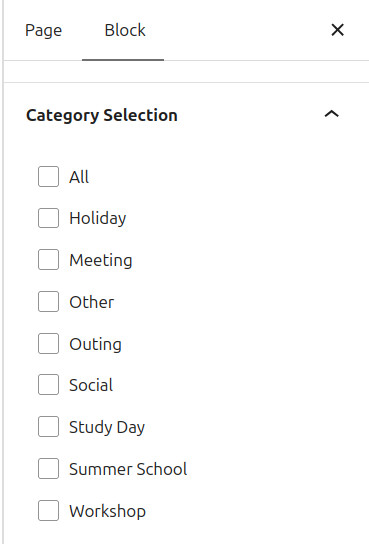
Allows the selection of categories. This allows the content provider to configure the list to show events defined by one or several categories
Limits #
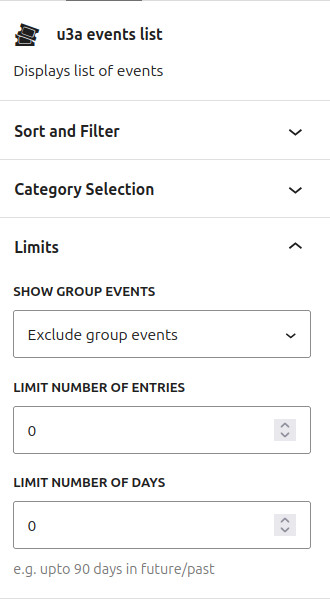
- Show group events: Three options are available: (i) Use the value set in u3s settings, (ii) Exclude Group Events, and (iii) Include Group Events. This allows the widget to be used on a specific group page, where only events relating to that group can be displayed.
- Limit Number of Entries: limits the length of the list of events; the number entered must be positive and greater than one. To display all valid events, set the limit number to zero.
- Limit Number of Days: Only displays events that are a specified number of days in the past or future. The maximum permitted value is 90. This feature overrides the limit on the number of entries. To display all valid events with no time limit, set the limit value to zero.
Layout Choise #
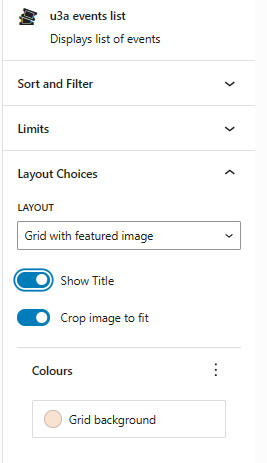
- The events can be presented as a Simple list, a Grid with the featured image, or a Single line (only displaying the date, time, and title). If the grid option is selected, the following additional options are available:
- The image can be cropped to make the grid symmetrical.
- The Background colour can be selected. Note that the Widget background colour will be changed to the grid background colour.
- Show Title: When selected, the basic Widget title (either Previous Events or Forthcoming Events, depending on the When option) is displayed. When deselected, a content creator can add a specific title using the WordPress Header Block. The H3 size should be selected to maintain a consistent appearance.
Adanced #
This option is available for additional CSS.
Publication #
On completion, select Publish. Once published, for example, an event of two days’ duration, linked to a specific group, will appear as:
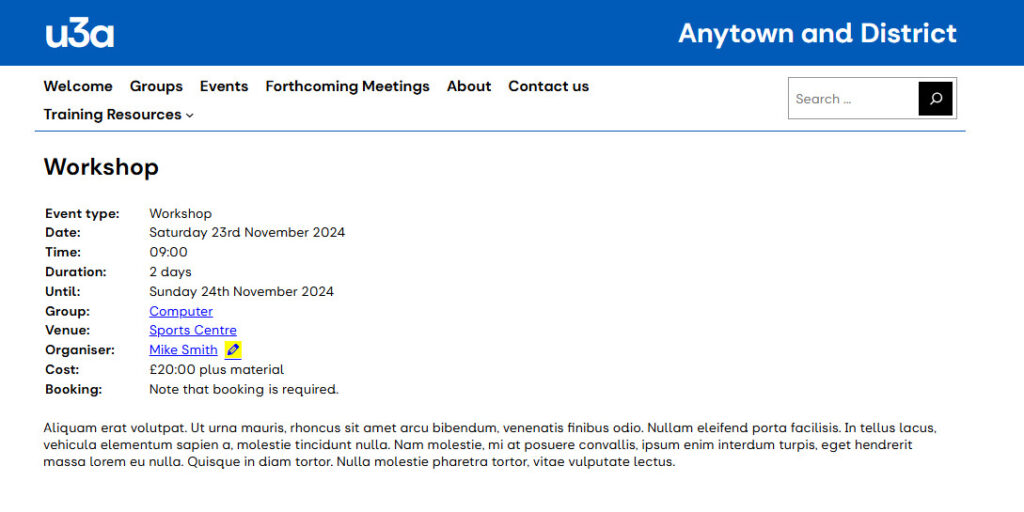
Selecting the links will provide visitors with more information about the group and the meeting venue. Additionally, the ability to message the event organiser is provided.
When logged in as a user with permission to edit a contact, an edit icon will appear next to a contact. On selecting, the user is directed to the contact’s page, allowing the information to be edited.
Reviewing and Sorting Events. #
From the Dashboard, select u3a Events ⇒ All Events, and all events are now shown:
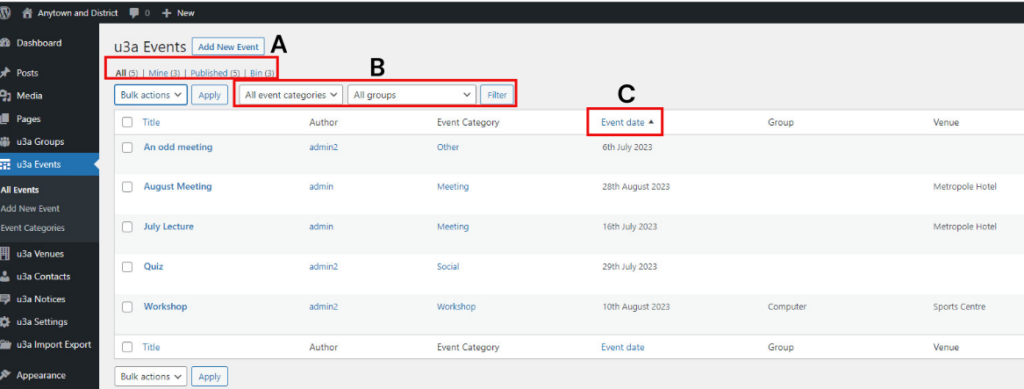
Summary information regarding events created is contained in A. The number of events created by the current user is shown after Mine (in this case, three). On opening the page, the default sorting is alphabetical by title. It is possible to sort and filter events by:
- To filter events by Categories or Groups, use the filter terms (B). Once the required criteria are set, select Filter. If an event belongs to a Group currently in Draft, it is in the list, but cannot be used as a filter term.
- Next to the Event date, small arrowheads (C) allow sorting in ascending or descending date order. Similar arrowheads are provided next to the Title heading.
Event Calendar #
SiteWorks will automatically generate or update an iCalendar file whenever a new u3a Event is added, or an existing u3a Event is edited.
The file is publicly accessible at the URL {sitename}/wp-content/uploads/event_calendars/u3a_event_calendar.ics. The file can be imported into any calendar system which accepts iCalendar (.ics) files.
If the calendar feature is required, it is the responsibility of the Website Administrator to select and install the required plugin. It should be noted that the ICS Calendar plugin was used in testing – https://en-gb.wordpress.org/plugins/ics-calendar/
Using the Shortcode #
While all the display options for the event list can be accessed from the settings sidebar, configuring a list using a shortcode is not currently recommended for a new application. The following information is provided to maintain legacy and edge cases.
The Shortcode has the general form of [u3aeventlist option], where option is the parameter that provides the customisation, and is in the form Command Word = “Parameter”. The available options are given below:
For events, the following options can be set:
| Function | Command Word | Parameter |
|---|---|---|
| Listing future or previous events | when† | past, future |
| Defines the order of events, either ascending or descending. | order | asc, desc |
| Lists events in a specific category | event_cat | all, selected event category |
| Listing events attached to a group | groups | y, n |
| Lists a specific number of events | limitnum | An integer greater than zero |
| Lists events within a specific number of days from the current date | limitdays | An integer greater than zero |
| Defines the layout either as a grid, simple list or a single line. | layout | grid, simple, line |
† The list of events will be headed with Forthcoming Events or Previous Events, depending on the parameter associated with when.
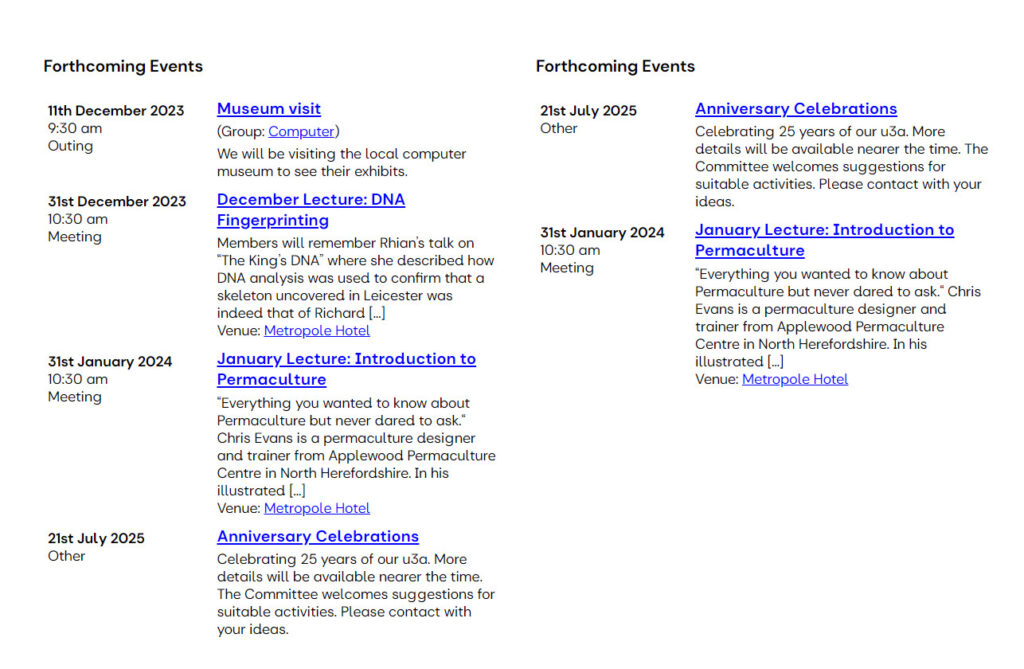
If no configuration options are set, the information added when the event was created is displayed. The shortcode option can contain one or more command words with their parameters to modify the display. For example, the following two-column layout is created using two shortcodes:
[u3aeventlist]
[u3aeventlist order = “desc” limitnum = “2”]
The following is displayed: the left-hand column shows the default event listing, while the right-hand column displays only two events (limitnum = “2”) in descending order (order = “desc”).