Introduction #
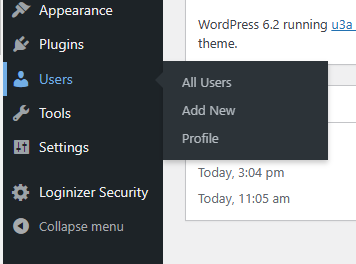
This guide discusses how a user’s details are added, edited, and, if necessary, deleted from SiteWorks. These tasks are undertaken via the Users Menu, which is only accessible to users with Administrator access rights and is located on the left-hand sidebar of the Dashboard. When creating a new user, reference should be made to the user’s role and password management guides.
Adding a New User #
The only information required to set up a new user is a username and a unique email address. It is recommended that the u3a adopt a standard format for generating usernames and passwords. It is also strongly recommended that the following process be followed to add a new user:
- Assign the user’s username and add additional details.
- Assign the user’s initial password.
- Select the user’s role.
- Confirm the new user’s details.
- Communicate the information to the user.
Detailed Consideration of the Process #
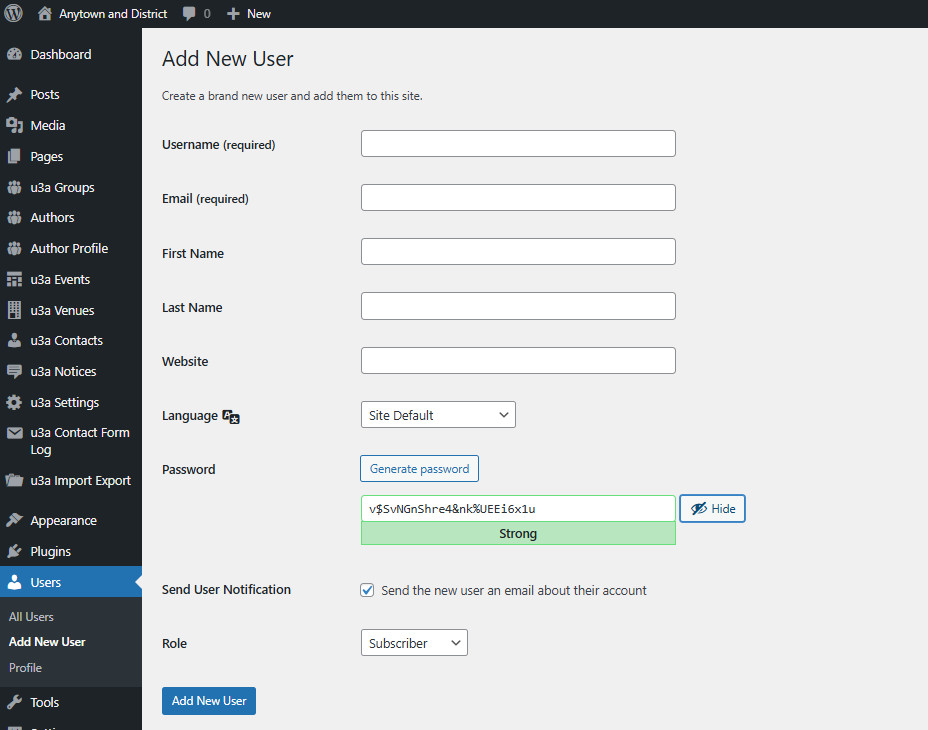
To start the process, from the Dashboard, select Add New to add a new user, or All Users to edit or delete a current user.
Assigning a Username and details #
Each new user is assigned a unique username. It is important to note that, once set, the user name can not be changed. The following points should be noted when assigning a username:
- The username should be ten characters or more, and include a mixture of upper and lower case letters and numbers. Dashes (-), period (.), underscores (_) and at sign (@) can also be used, but other punctuation characters are not permitted in WordPress.
- As good practice, no part of the username should refer to (i) the u3a in general, (ii) the local u3a’s name, and (iii) the name and position of the user.
- In the WordPress core, the user name is not case-sensitive. For example, NightWatchMan and NIGHTwatchMAN are both accepted. Usernames are not case-sensitive when handled by the WordPress core. However, some plugins may require an exact match, so treating them as case-sensitive is recommended.
In addition, a unique email is required; all other information is optional. The user can customise their view and add additional information by editing their Profile.
Assign a password #
A password for the initial login needs to be provided for the new user. This can either be:
- A string of random characters generated by WordPress or a password manager.
- A more memorable password based on the three-word principle.
Irrespective of the approach taken, the password must conform to the following specifications:
- Between 8 and 64 characters, a minimum length of 12 characters is recommended.
- Includes at least one upper case letter, a lower case letter, a digit and a punctuation mark from the following list: ! £ $ ^ & * ( )_ – ~
To minimise password (and username) transcription or similar errors I, 1, O, 0, B 8, G, 6, Q, D, S, 5, Z, and 2 should be avoided. In addition, quotation marks can lead to confusion with Apple users.
WordPress computes the relative strength of the entered password based on several parameters including length, number of different and or repeating characters. The result is classified as Very Weak, Weak, Medium and Strong.

It should be noted that the password strength calculation DOES NOT consider the SiteWorks password specification. Hence, before confirming a new user, the Administrator must confirm that the password:
- Conforms to the SiteWorks specification and includes at least one upper case letter, a lower case letter, a digit and a punctuation mark, and
- WordPress indicates that the password is strong.
Further advice on password security can be found in the password management user guide and information provided by the UK National Cyber Security Centre.
User Notification tick box #
Important: Remove the tick from the box labelled Send User Notification. Emails sent using this option may be rejected by the new user’s email account as spam or phishing emails, are often not delivered successfully, and may impact the server’s reputation, as discussed here.
Select the user’s Role #
It should be noted that any new user is assigned the Author role by default, the most restrictive available, unless changed by the Administrator
Confirm the new user. #
On completion, select Add New User, then check the top of the page. If the following appears, the new user has accepted:

If the entered username does not conform to the above requirements when Add New User is selected, the following error message will appear at the top of the page, and the username will be changed:

If the following message appears at the top of the screen after selecting Add New User, the entered password has not been accepted and should be re-entered.

Sending the information to the new user #
The user’s username and initial password should be sent using the email address held in the u3a membership records (i.e. Beacon or a similar system), ensuring that an audit trail is maintained. In addition, the username and password should be sent as two separate emails.
When the Administrator sends a new user their initial login credentials, the new user should be recommended to change their password via their user profile on the initial login.
Managing Users #
By selecting All Users, a list of all the users is provided, showing their email address, role and the number of posts they have created.

To undertake a change, the user is selected by checking the box on the left to allow the User’s profile to be viewed, edited or have their role changed.
There is an additional function available from this screen; in particular, the Administrator may send a Password Reset email to a user who has forgotten their password. However, it is important to note that such emails may be rejected by the user’s email account and result in reputational issues, as these emails can be interpreted as spam or phishing. It is recommended that any new password be sent using an email. If the u3a uses Beacon or similar, this route is preferred as the email will be recorded in the audit log.
Changing a user assigned to a Page or Post #
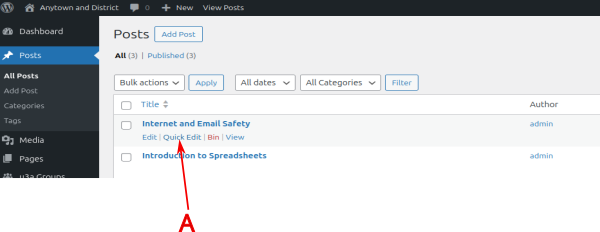
To change the WordPress page or post author, select the required page or post from the WordPress dashboard. Hover the mouse over the page or post you wish to change and then click the ‘Quick Edit’ link under it (A).
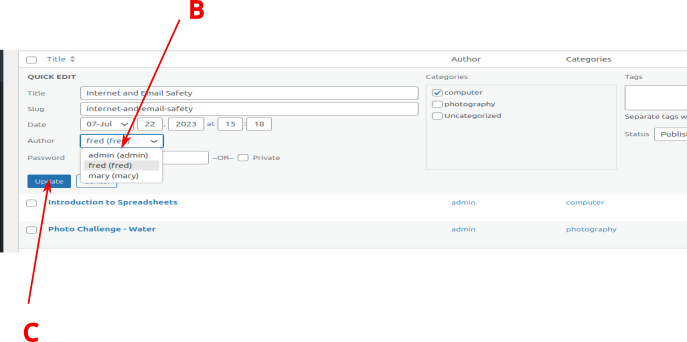
This will open up the Quick Edit tab on the screen. From here, click on the current author’s name and select a new author from the dropdown menu (B). Finally, click the ‘Update’ button to save your changes (C).
Deleting a User #

WordPress requires all pages and posts to be assigned to a user. When deleting a user, the Web Site Administrator should be aware that any content created by that user is also deleted, unless the administrator assigns the content to another user.
When the Administrator select delete from the options given when hovering over the user’s name, the following options are displayed:
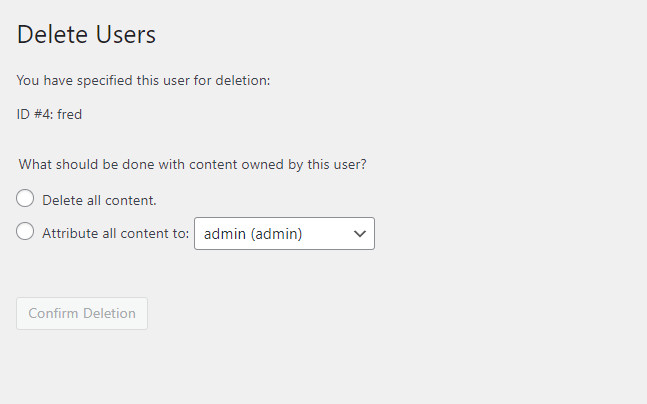
- Delete all content: permanently delete all the content generated by the user (i.e., there is no recovery from the bin option). It is advised that this option is not selected.
- Attribute all contents to: this option will allow the administrator to assign all the content created by the user to be reassigned to any other user in the system. For example, if a group leader changes, all the content created by the outgoing group leader can easily be assigned to the new group leader, as long as that person has been added as a user before the original user is deleted. The user who will be taking over the content can be selected from the pull-down menu.
Once an option is selected, select Confirm Deletion.


